「ルールズ・オブ・プログラミング より良いコードを書くための21のルール」を読んだ

すごく良かった。リーダブルコードや良いコード/悪いコードで学ぶ設計入門などの既存の書籍とはまた別の切り口が新鮮で、随所で自分の経験や知識と重なる部分があって参考になった。ゲームプログラミングで得られたプラクティスという謳い文句が変に間口を狭くしていないか心配。
「一般化には3つの例が必要」の章なんかは、関数を汎用化したほうが良いという一般論と、汎用化しすぎて何をする関数なのかわからないことがあるという経験とで揺れていた自分の価値観に一つわかりやすい指標ができて、一つ悩みが減った気がする。他にもハッとさせられるようなアイディアが紹介されていて、自分のコーディングスタイルに新しい規約のようなものが追加され、今後悩む部分が減ったという実感がある。
ただし、この本はリーダブルコードのようにルールとなる点を作るのではなく、自分の経験の中に眠っている点と点を繋げるような性質のものが多い気がする。そもそも元となる点が無いと何を言っているのかわからないし共感できないと思う。Amazonのレビューにポツポツついている低評価はそれが原因じゃないだろうか。
正直良いプログラムの書き方的な悩みがほとんど解決した感覚すらあり、いい本に出会えてよかった。そのぐらい個人的にはおすすめな本。
- ルールが浸透するには覚えるのが簡単なのと、適用される状況の認識が簡単の2つが重要
- 後者は自分の中から出てこない発想だった。自分が作ったルールがワークしなかったケースの殆どの原因がそれかもしれない
- 関数を一般化させないといけないという要件は無い。例がない状態で想像のユースケースで一般化しても、その想像が的中するとは限らない。
- 一般化していない関数はシンプルなので、3つの例が集まったときに一般化させやすい。逆に不要な要件を持ってしまった関数と別の例で一般化するのは難しい。
- 最適化するな、の話は解釈の仕方で感想が分かれそう。自分は納得できた。シンプルなコードであれば、パフォーマンスが問題になったときの改善も容易である。だから早まった最適化はせずにひたすらシンプルなコードを目指そう。
- 次の章に書かれている筆者の同僚とのディスカッションも興味深かった。一般的にはパフォーマンスが問題になるプログラムはごく一部だが、パフォーマンス改善をしている人が関わるプログラムは100%パフォーマンスが悪い、だから過剰に反応している、という。
- 実際のところ、シンプルなコードから劇的にパフォーマンス改善できてもまだ足りなくて困る、という状況はあるだろうから、本当に人によるかも
- コードレビューはレビュアーに見せるコードを書くというマインドセット、レビュアーに説明するというプロセスが重要であって、レビュアーがどうレビューをするか?という点はさほど問題ではなさそう
- レビュアーがバグを見つけるのを期待するようなレビュールールが現実的でないと思っていたので納得感があった。我が社の障害の振り返りでもレビューしっかりやるみたいなアイディアが多数あって心配していたが、そのモヤモヤが言語化できた
- 実行されないコードは動かない、壊れるという話がコメントにも適用されたのは面白かった。コメントで前提条件をごちゃごちゃ書くならアサートを仕込めとのこと
- ある課題を解決するために事前に計算して推測することで、うまくいかないアイディアをフィルタリングすることができる。うまくいくアイディアかどうかは実際に試さないとわからない。
FlutterのTabのラベルの色はLabelStyleで設定できない
This does not influence color of the tab labels even if TextStyle.color is non-null. Refer labelColor to color selected tab labels instead.
LabelStyleにcolorを設定しても無視される。代わりにLabelColorに色を設定する。
何か理由があって分けているのだろうか?
FlutterのBottomNavigationItemのデザインをThemeで設定するときは気をつけよう
FlutterのBottomNavigationBarに設定するBottomNavigationItemの色を変更したい。その時にウィジェットのselectedLabelStyleやunselectedLabelStyleを変更すれば値が反映されるが、Themeの設定を変えてもデフォルトのままになり設定は反映されない。というバグがあり、それがPRで取り込まれていた。
この変更により今までThemeが反映されなかったアプリもアップデートでThemeが優先されてUIが変わってしまう。つまり破壊的な変更であり、予期せぬ変更のリスクが高い。
なのでこの変更はuseLegacyColorSchemeというBottomNavigationBarのプロパティをデフォルトのtrueからfalseに変更し直す必要がある。
そういうバグがあり得ること、そういう思考プロセスで変更を取り込んでも自動で反映されないようにすること、が全く頭になかったので自分がこの事象に遭遇した時に地味に時間を使ってしまった。
Flutterアプリでfirebase_ui_authを使ってメールログインを追加する
事前準備
Firebaseプロジェクトを作成し、アプリリポジトリを接続する。特にこだわりがなければ、firebase_analyticsを導入して動作確認するのがオススメ。
FirebaseAuthの準備
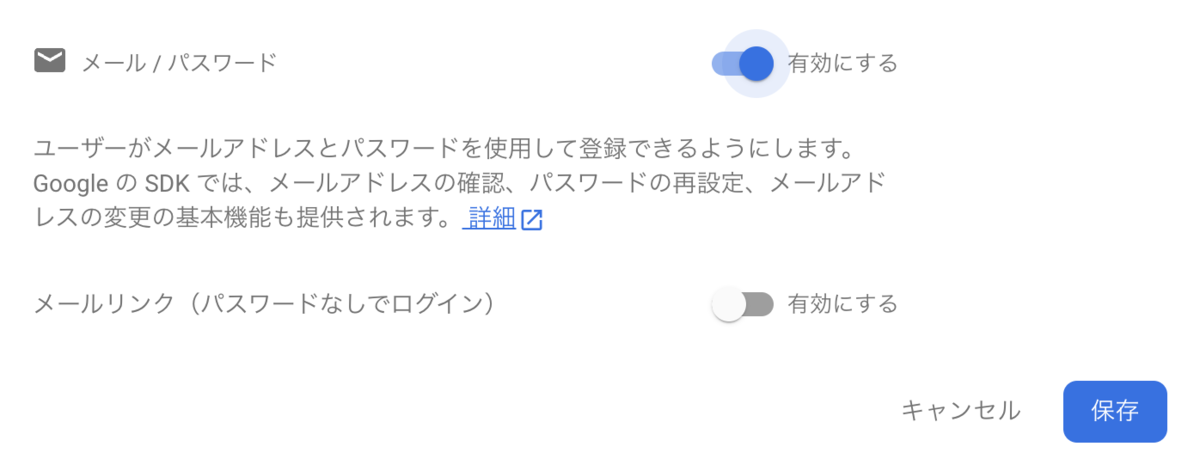
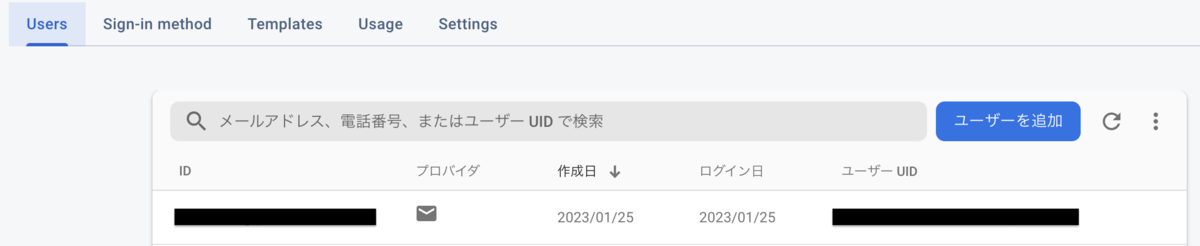
Firebaseのコンソールを開き、Authを有効にする。Authはログインプロバイダを複数提供しているので、今回はその中からメールログインを選択して有効にする。

ライブラリを導入
$ flutter pub add firebase_auth
$ flutter pub add firebase_ui_auth
$ flutterfire configure
アプリにメールログイン画面を追加する
アプリ起動時にプロバイダの設定処理を呼び出す
main.dart
Future<void> main() async {
  WidgetsFlutterBinding.ensureInitialized();
  await Firebase.initializeApp(
    options: DefaultFirebaseOptions.currentPlatform,
  );
  FirebaseUIAuth.configureProviders([
    EmailAuthProvider(),  // 利用するログインプロバイダを設定する。今回はメールのみ
  ]);
  runApp(const MyApp());
}
firebase_ui_authがSignInScreenを提供しているのでそれを使う。AuthStateChangeActionのコールバックでログイン後の処理を呼び出す。今回はログイン後にサンプル画面に遷移する
my_app.dart
class MyApp extends StatelessWidget {
  const MyApp({super.key});

  @override
  Widget build(BuildContext context) {
    final providers = [EmailAuthProvider()];

    return MaterialApp(
      title: 'Flutter Demo',
      theme: ThemeData(
        primarySwatch: Colors.blue,
      ),
      home: SignInScreen(
        providers: providers,
        actions: [
          AuthStateChangeAction<SignedIn>((context, state) {
            Navigator.of(context).push(
              MaterialPageRoute(
                builder: (context) =>
                    const MyHomePage(title: 'Flutter Demo Home Page'),
              ),
            );
          }),
        ],
      ),
    );
  }
}

uses-sdk:minSdkVersion 16 cannot be smaller than version 19 declared in library [:firebase_analytics]
Flutterでfirebase_analyticsを導入したところ、Androidでビルドエラーになった。
***/android/app/src/debug/AndroidManifest.xml Error:
    uses-sdk:minSdkVersion 16 cannot be smaller than version 19 declared in library [:firebase_analytics] ***/build/firebase_analytics/intermediates/merged_manifest/debug/AndroidManifest.xml as the library might be using APIs not available in 16
    Suggestion: use a compatible library with a minSdk of at most 16,
        or increase this project's minSdk version to at least 19,
        or use tools:overrideLibrary="io.flutter.plugins.firebase.analytics" to force usage (may lead to runtime failures)

FAILURE: Build failed with an exception.

* What went wrong:
Execution failed for task ':app:processDebugMainManifest'.
> Manifest merger failed : uses-sdk:minSdkVersion 16 cannot be smaller than version 19 declared in library [:firebase_analytics] ***/build/firebase_analytics/intermediates/merged_manifest/debug/AndroidManifest.xml as the library might be using APIs not available in 16
    Suggestion: use a compatible library with a minSdk of at most 16,
        or increase this project's minSdk version to at least 19,
        or use tools:overrideLibrary="io.flutter.plugins.firebase.analytics" to force usage (may lead to runtime failures)

┌─ Flutter Fix ─────────────────────────────────────────────────────────────────────────────────┐
│ The plugin firebase_analytics requires a higher Android SDK version.                          │
│ Fix this issue by adding the following to the file                                            │
│ ***/android/app/build.gradle:                       │
│ android {                                                                                     │
│   defaultConfig {                                                                             │
│     minSdkVersion 19                                                                          │
│   }                                                                                           │
│ }                                                                                             │
│                                                                                               │
│ Note that your app won't be available to users running Android SDKs below 19.                 │
│ Alternatively, try to find a version of this plugin that supports these lower versions of the │
│ Android SDK.                                                                                  │
│ For more information, see:                                                                    │
│ https://docs.flutter.dev/deployment/android#reviewing-the-build-configuration                 │
└───────────────────────────────────────────────────────────────────────────────────────────────┘
Exception: Gradle task assembleDebug failed with exit code 1
記載の通り、minSdkVersionの記述を変えたところ解決した。flutter的には16だがfirebase_analytics的には19以上が必須で、個人的にもっとサポートOSを減らしたいので22に設定した。
android {
  defaultConfig {
      minSdkVersion 22 // もともとは flutter.minSdkVersionだった。
  }
}
Unhandled Exception: Binding has not yet been initialized.
FlutterアプリにFirebaseを導入した。pub get後に関数(analyticsのメソッド)を呼び出したらエラーが発生した。
E/flutter ( 6837): [ERROR:flutter/runtime/dart_vm_initializer.cc(41)] Unhandled Exception: Binding has not yet been initialized.
E/flutter ( 6837): The "instance" getter on the ServicesBinding binding mixin is only available once that binding has been initialized.
E/flutter ( 6837): Typically, this is done by calling "WidgetsFlutterBinding.ensureInitialized()" or "runApp()" (the latter calls the former). Typically this call is done in the "void main()" method. The "ensureInitialized" method is idempotent; calling it multiple times is not harmful. After calling that method, the "instance" getter will return the binding.
E/flutter ( 6837): In a test, one can call "TestWidgetsFlutterBinding.ensureInitialized()" as the first line in the test's "main()" method to initialize the binding.
E/flutter ( 6837): If ServicesBinding is a custom binding mixin, there must also be a custom binding class, like WidgetsFlutterBinding, but that mixes in the selected binding, and that is the class that must be constructed before using the "instance" getter.
メッセージの通り、runApp の前に WidgetsFlutterBinding.ensureInitialized()を呼び出したところ、エラーが解消した。
void main() {
  WidgetsFlutterBinding.ensureInitialized();
  Firebase.initializeApp(
    options: DefaultFirebaseOptions.currentPlatform,
  );
  runApp(const MyApp());
}
Freezedで生成したClassにインスタンスメソッドを追加する
FlutterでFreezedを利用した際に、生成したClassに独自メソッドを追加する方法を調査しました。
@freezed
class Person with _$Person {
  const factory Person(String name, {int? age}) = _Person;

  void method() {
    print('hello world');
  }
}
このコードでは、method()が正しく生成されずにエラーになります。継承(implements)からMixin(with)に記述を更新することで、正しくコード生成されるようになります。
@freezed
abstract class Person implements _$Person { // withではなくimplementsを利用する
  const Person._(); // privateのコンストラクタを追加する
  const factory Person(String name, {int age}) = _Person;

  void method() {
    print('hello world');
  }
}